
Tutorial: How to Make a DIY (Do-it-Yourself) Reptile Incubator!

*Ball-Pythons.net
When it comes to herpetoculture, or the keeping and breeding of reptiles and amphibians, having a solid, well-functioning incubator is often one of the most important aspects for this process. There are indeed many reputable and well made, commercially available incubators of all sizes, shapes, and dimensions available, and are certainly an option for anyone looking to breed their reptiles. If, however, one happens to be interested in DIY (do-it-yourself) projects, and are looking into ways as to how one can be made, or if the overhead costs and space associated with larger, commercially available incubators may be higher than expected or desired, building your own incubator can oftentimes be a suitable alternative for a hobbyist or breeder looking to breed their reptiles.
Likewise, building a homemade, or DIY incubator can oftentimes be a relatively simple and straightforward procedure in the event that even if your reptile unintentionally breeds, reproduces, or happens to lay eggs in its enclosure, and there is a chance that the eggs appear to be, or might be fertile and viable, building such a DIY may also become necessary. In this educational tutorial, we will describe the variety of methods and materials which can be used to construct a homemade incubator from start to finish, as well as the pros and cons, or benefits and disadvantages of each of these materials or methods.
Materials and Supplies Needed:
1. -A relatively well insulated container with a lid or top (or the necessary supplies to build on one’s own).
2. -A quality Thermostat needed to maintain proper temperatures.
3. -A quality, accurate thermometer and hygrometer.
4. -A Heating source (which can include a heat cable, UTH or under tank heating pad, specified bulb, or heating tape)
5. -Heat safe and resistant tape.
6. -A drill and drill bits, to create wire access through to the container.
7. A suitable incubation container for the eggs or clutch.
8. Suitable substrate for incubation (such as vermiculite, spaghnum moss, etc.)
1. Incubation Containers:
There are a number of different containers which can work well for creating a DIY incubator, as long as they are relatively sturdy and well-insulated. Some of these, examined below, can include plastic food and drink coolers, Styrofoam boxes, insulated food or other shipping containers, and even DIY foam boxes made from sheets of home insulation boards. Used, or repurposes freezers or refrigerators can also work very well for incubators, but require additional re-wiring, skill, and expertise in order to make work. The type and size, as well as dimensions of the incubator container really depend on one’s budget and space considerations, as well as expected numbers of eggs or clutch sizes, so it is best recommended to plan ahead whenever possible.

*Styrofoam Box/Container. Pros: Premade, Inexpensive Price, Utilitarian, Easiest and Least Expensive Option. Cons: Low Durability, Less Aesthetics/Professional Appearance.

*Plastic Food and Drink Cooler. Pros: Relatively Affordable Price, High Durability, Easy to Locate and Re-Purpose. Cons: Less Professional/Aesthetics Appearance.
In general, unless one has selected a re-purposed freezer or refrigerator as their DIY incubator, very little to no wiring should be required other than to plug the heating source into the thermostat, and the thermostat into a wall outlet. It is best to select a container material one is most comfortable working with. Overall, the container itself is generally one of the less expensive aspects to a DIY incubator; and also do not worry if the container used or built ends up being slightly larger than what may be needed, as it usually does not hurt than to have one end up too small.

*Re-Purposed Refrigerator or Freezer. Pros: Can Come in Medium and Large Sizes, Most Solid and Durable Option, Most Professional in Appearance. Cons: Can be the Most Expensive Option, Requires the Most Skill and Difficulty to Re-Purpose.
Re-purposed freezers and refrigerators, which can often be found in used condition on one’s local classifieds, tent to be the most difficult and expensive types of containers which can be used for DIY incubators, or at least require the most skill and labor in order to do so. However, they also tend to be the most durable and professional looking in appearance, as they are typically well insulated, and have multiple shelves or usable space and versatility within. Ideally, a freezer or refrigerator which is already de-pressurized, or with no compressor is ideal, and also helps reduce expenses. For these, holes must also be precisely drilled between the inside and outside in order to add the probe and heating elements, which require 100% certainty that there are no additional wires, coolant lines, or other internal hazards running at or near the drilling location. With a bit of additional patience, skill, and electrical experience, a re-purposed freezer or refrigerator can make for the most superior DIY incubator.

*Glass Terrariums/Aquariums. Pros: Wide variety of sizes and dimensions available. Easy to source or locate. Easy of Visibility within. Cons: Can be more expensive as containers. Screen/wire/mesh tops or vents must be covered to prevent heat and humidity loss, can be heavier, bulkier, or less space efficient.

“Older-school” chicken or other poultry egg incubators can also be used as an incubator for your snake’s or other reptile’s eggs, but may require additional internal wiring and other modifications, as with re-purposed refrigerators and freezers. The pros to these types of incubators are that poultry incubators are usually relatively inexpensive, and are quite durable and well insulated, and also may be available in a number of different sizes and dimensions. Some cons are that, as mentioned before, their heating elements and/or temperature sensors and probes can be less accurate, potentially leading to overheating, and thus may require additional wiring modifications and upgrading to a more reliable and precise thermostat.


*Examples of eggs/clutches in suitable containers and substrate. © Platinum Morphs.com, Reptile Basics, and Josh’s Frogs.
In most cases, a suitably sized egg crate or container used for holding and containing the eggs, while adding additional security and insulation will be needed. There are a variety of plastic containers which can work for this purpose, and depending on the species, size of clutch or number of eggs, and other factors. Plastic petri-dishes, deli-cups, or plastic shoe-box containers with holes drilled into the top of the lid or along the sides for adequate airflow and ventilation will work well. The container should be large enough to be able to be fitted inside the DIY incubator.
There are several different substrates which can be used to line the egg or clutch container as well, but should generally be able to hold and retain at least some moisture and humidity while insulating the eggs, and not become too dry as to dry the clutch out, or be too wet and moist as to drown the eggs or cause other bacterial or fungal buildups. The exact substrates, temperatures, and humidity will of course depend on the species being incubated, although vermiculite, peat moss, perlite, or sphagnum moss are some of the most commonly used substrates for most species. Conversely, some commercially available plastic egg trays or crates with indentations for each egg to sit in are also available. It is also important to always maintain the eggs or clutch in their original orientations, as not to inadvertently drown the embryos inside, or cause other damage. Using a pen or a marker, a marking can be made on the side of each egg in the orientation they are facing upwards in to maintain this.
3. Heating Sources
The heating elements are the next important component to a DIY incubator, and there are several options to consider. One of these most important considerations is making sure heat is evenly distributed over the clutch to be incubated, which can often influence the size and orientation of the DIY incubator used. Placement of the heating element should consider where the eggs or clutch will be located within the incubator, in order to ensure that eggs or the clutch does not overheat, or does not receive adequate heat and become too cold. This is why using a suitable thermostat and monitoring device are important. As such, using a heating element that is too large for the incubator, or vice versa, too small for the incubator can be problematic.
Below are some possible heating elements which can be used to heat an incubator, which some being much better, or more suitable than others. For any of these heating elements, it is always important to keep the eggs or clutch elevated and out of direct contact with any heating element used.


*Reptile Heating and Ceramic Bulbs. Pros: Relatively Inexpensive, Many Different Products for Different Purposes, Evolving Technology to Become Better Options, Easy to Find and Source. Cons: May Not Evenly Distribute Heat, Can Have Less Keeper Efficiency, Shorter Lifespan.

*Flexwatt Heat Tape. Pros: Relatively Economical, Efficient, Long Lasting. Cons: Can be Somewhat Harder to Find or Source Locally, May Require Additional Cutting to Specifications and/or Wiring (Not Pre-Wired), Must Require a Thermostat.

*Reptile UTH (Under-Tank Heating) Pads. Pros: Widely Available and Easy to Source, Many Different Sizes and Dimensions, Pre-Wired and Easier to Use, Evolving Technology to be Self-Regulating. Cons: Often Still Requires a Thermostat, Can Sometimes Be More Expensive Options.

*Reptile Heating Cables. Pros: Efficient and Reliable, Long Lasting, Versatile and Easy to Customize, or Fit into Nearly any Incubator on Bottoms and Sides, Good for Providing Radiant Heat. Cons: Require Thermostats or Dimmers to Prevent Overheating, Can be Difficult to Find or Source Locally.
4. Thermostats for DIY Incubators.
Having a good, working thermostat is perhaps one of the most important components in ensuring that the DIY incubator holds and regulates an accurate and consistent temperature level without overheating. It is important to consider the species of animal one will be incubating, which will play a large role in determining which type of thermostat one should consider, as well as the specific temperature and humidity levels needed for that species and their eggs or clutches. For some species, a species whose eggs can generally handle wider, or greater temperature fluctuations may not need as accurate of a thermostat, while likewise, other species may have much more specific and precise clutch temperatures, requiring a more accurate thermostat and higher degree of accuracy. It all really depends on the research needing to be done on each individual species and their incubation requirements.
There are many different brands and styles of thermostats available; however, the most common and widely used thermostats include mechanical or analog thermostats, digital thermostats, and pulse proportional thermostats. Each of these have their own advantages and disadvantages,

*Mechanical/Analog/Dial Thermostats. Pros: One of the Most Common and Available Types of Thermostats, Some Can be High Quality, Reasonably Affordable and “Budget” Thermostats. Cons: All can have some degree of “temperature swing”, which is the variance in temperature between the thermostat turning on and off to maintain a roughly steady temperature. Some can also be less accurate and lower quality than others. Lower quality mechanical thermostats not made for reptiles or reptile incubators should be avoided.

*Digital Thermostats. Pros: Better quality and accuracy than mechanical/analog thermostats. Easier to tweak, monitor, and change and set temperatures, Some come with a probe or infrared thermometer to monitor temperatures inside the incubator. Less on/off “swing”. Cons: Can still have some temperature “swing”, some can be a bit more expensive to purchase.

*Pulse Proportional Thermostats. Pros: The highest quality thermostats, the most accurate and with the lowest amount to no temperature “swing”, gradually rises and lowers the power going into the heating element to maintain a steady temperature. This gradual power cycle is continually repeated, giving these devices the name “pulse” proportional thermostats. Cons: Generally the most expensive options for thermostats.
5. Monitoring Temperatures.
As mentioned previously, the temperatures within the incubator will also need to be monitored. Some of the digital and pulse proportional thermostats mentioned above also have internal and external probes, which can accomplish this purpose, but there are a few other options available as well.


*Mechanical/Analog Thermometer Dials and Strips. Pros: Generally the least expensive options available. Readily available and easy to locate and source. Good for rough, or general temperature gauges. Cons: No internal or external probes to be able to monitor without opening the incubator or enclosure. Much less accurate and subject to malfunction or outer temperature and humidity influences. Not recommended for critical temperature ranges.

*Digital Thermometers. Pros: Some come with internal and external probes which do not require opening the incubator. Thermometer and hygrometer combination units available. More accurate than mechanical or analog thermometers, and easier to read and gauge. Cons: Some higher end units with additional features can be more expensive. Some units might not have external probe.

*Infrared Thermometers/Temperature “Guns”. Pros: Handheld and easily portable. Can be used to monitor different points within the enclosure or incubator. Generally the most accurate and highest quality type of thermometer. Cons: Usually do not come with an external probe and require opening the enclosure or incubator. Some units can be the most expensive type of thermometer option. Can still have varying readings depending on distance used depending on brand or model.

*Liquid Thermometers. Pros: Higher quality models can be relatively more accurate than other mechanical thermometers. Full immersion or general use thermometers are types which work best for reptiles. Also a less expensive and affordable option for thermometers. Cons: Slower response time than digital thermometers. Usually do not have an external probe. Some can be harder to read accurately. Can be more fragile thermometers, particularly partial-submersion ones, and can be influenced by outer temperatures and humidity.
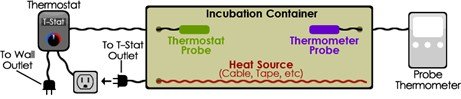
*Basic DIY Reptile Incubator Layout. © NERD Reptile.
Now that we have covered the different materials and methods needed to build a DIY incubator, here are the following steps in order to construct such an incubator. Unless one is re-furnishing a refrigerator or freezer, building a DIY incubator can be a relatively simple process, with little to no wiring or electrical work needed other than knowing how a thermostat and thermometer work, and being able to plug them into their units. In this section, we will cover techniques which can be used, as well as to avoid.
1. Ensure the Container is Well Constructed. As mentioned before, it is important to consider that any container used as a DIY incubator should be well-sealed and well insulated. Preventing excessive airflow or ventilation will help maintain a steady and predictable temperature within the incubator. If there are any gaps or cracks within the incubation container, these can be filled with an aquarium grade silicone, if needed. This silicone is very heat resistant, as well as water and air-tight. Allow the silicone to fully cure, if needed.
2. Add the Heating Element. Heating cables and Flexwatt heat tape are two of the most common and widely recommended heating elements which can be used for a DIY incubator. It is always important for any heating element used to follow the manufacturer’s instructions and directions for intended use and installation. Next, using a power drill, drill a wiring hole for the heating element on one side of the container. This wiring hole is necessary for attaching and connecting the heating element, which can afterwards be sealed with silicone if needed. The type of heating element used will depend on how it should best be installed. Any incubation container used to house the eggs or clutch should always be elevated above the heating element, and not placed directly onto it. This should allow for better heat and air movement within the incubator, and protects them from overheating.
For heating cables, this heating element can be installed in a “back and forth” pattern. Use an aluminum heat safe or resistant tape to hold the cable in place. Make sure the cable does not overlap itself, be tightly bent, or have anything placed directly on top of it, as this can affect heating and electrical flow. Most brands leave the first three to six feet of cable unheated, in order to allow for enough space to reach the appropriate and intended location. Run the cable evenly across the bottom of the container to help ensure evenly distributed heating throughout, and since heat rises. Most heat cables are relatively thin, and for these heating elements, typically a 1/4th inch hole can be drilled in the incubation container.
Flexwatt heat tape is the other most commonly used heating element for DIY incubators. However, in most brands and cases, heat tape requires the end user to wire the element themselves, and must be cut and sized accordingly, manually. As with heating cable, Flexwatt heat tape should be installed on the bottom of the container to allow for heat to rise, and be secured in place with a heat and electrical resistant tape. For another tutorial on how to install Flexwatt heat tape, see that tutorial separately.
3. Adding the Thermometer. Adding the thermometer inside the incubator is the next step. Ideally, a thermometer with an external probe should be chosen so temperatures and conditions inside the incubator can be monitored without having to open it and potentially change or influence the temperatures to outside conditions. The probe, or any other type of thermometer, should be placed nearest to the area where the eggs are to be incubated. For taller or larger DIY incubators, it never hurts to add another thermometer as well to better monitor temperatures. If using a thermometer with a probe, use the power drill to drill another hole in one side of the container to insert the probe and wire runs. This hole can then be sealed with silicone as well, if needed.
4. Add the Thermostat’s Probe. The fourth step is adding the thermostat’s probe. The placement of the probe may require some consideration and planning, as placing the probe near the top of the DIY incubator can see the hottest air as it rises, and cause less accurate readings and performance. Likewise, placing the probe too near to the heat source can create more rapid on and off cycling due to the thermostat regulating the heating element. Ideally, the thermostat probe should be placed nearest to where the eggs will be incubated. In larger DIY incubators, or even in general, placing the probe in about the center of the enclosure or incubator, or about halfway between the top and bottom, will help one get the most accurate readings and measurements.

*Graphic showing the suitable and unsuitable elevations and container placements within a DIY incubator using an elevated shelf. © NERD.
5. Place the Egg Crate or Container Inside the DIY Incubator Appropriately. As mentioned before, there are a number of different types and styles of plastic containers which can work well for maintaining a clutch or eggs within, depending on the species, their temperature, incubation times or periods, humidity, and other factors. Placement of the containers within the DIY incubator is important to ensure that the heat within is distributed evenly. For this reason, it is best to consider one or more elevated shelves so that the container and eggs are not sitting on top of, or in direct contact with the heating element. Doing so helps add space around and underneath the container(s) for better air flow and circulation underneath, around, and in between them. These shelves should be of a lightweight material which allow air to pass freely through them, such as a plastic or metal mesh or grid. One can even get creative and use other, similar things such as light diffuser material, plastic fine chicken, poultry, or livestock fencing, dish racks, or wire closet or shoe organizers. This is also one reiterated benefit to using a re-purposed freezer or refrigerator, in that these shelves may often already be available or provided. Also keep in mind any temperature differentiations within larger or taller DIY incubators as well.
6. Wire the DIY Incubator and Begin to Turn it On. As mentioned before, unless one is re-purposing a used refrigerator or freezer to become an incubator, wiring and setting up a DIY is typically relatively simple at this point, and once all of the probes and thermostats are in place. Plug the heating element into the thermostat’s outlet, and then plug the thermostat into the nearest wall outlet. After that, set the desired temperature using the thermostat’s dial, or buttons (depending on the model, style, or brand), and allow for at least one or two hours for temperatures within the incubator to set and become steady. Then adjust the thermostat accordingly, if needed.
On less expensive, or lower quality thermostats especially, the temperature dial or reading might not always be as accurate as desired, and may require additional dialing up or down, depending on the probe’s thermometer reading. It also never hurts, as mentioned before, to use two thermometers within the DIY incubator to provide extra reassurance that temperatures are correct, and within a safe range. Before inserting the egg container or crate, allow the DIY incubator to cycle through for at least a day or two to ensure it is working properly and temperatures are where they should be.
7. Modify the Humidity, if Needed. Maintaining the proper and correct humidity within the DIY incubator and egg containers depends on many different environmental and husbandry factors, and each DIY incubator may perform differently depending on the size, style, and material used. As mentioned before, it is highly recommended to use a quality and accurate digital hygrometer and thermometer to gauge the relative humidity.
If the clutch being incubated is of a species requiring higher, or more precise humidity, or if humidity needs to be raised in general, the easiest and most simple way is simply lightly misting the clutch, but care should of course be taken to avoid any fire or electrical hazards in doing so. Likewise, a container of water can also be placed inside the DIY incubator near the heating element while leaving a partial opening on top of the incubator for the heat and water vapor to escape from. Likewise, care should be taken that the container of water in the incubator is stable enough to prevent being spilled or disrupted and also potentially creating hazards. This water can also help stabilize the humidity and temperatures within the incubator, while adding the needed and beneficial humidity.
However, in most cases, choosing the right egg container and the right incubation substrate can largely lead to the humidity self-maintaining, making the ambient humidity less relevant. There are a number of ways to still raise the humidity, if needed, depending on the substrate used and species being incubated. In most cases, however, water can be sprayed or added directly to the egg container to raise humidity as needed. Be sure to not add too much water at a time, which can cause oversaturation. If the humidity becomes too high, the egg container can be left partially or fully opened to allow humidity to escape. If there is too much water or moisture in the container to be able to be dried out quickly on its own, it can be drained out, or tipping the container to remove excess water.
CONGRATULATIONS!!! You Have Successfully Completed Building Your Own, Homemade, DIY Reptile Incubator! Good Luck, and Enjoy!